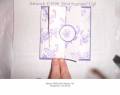
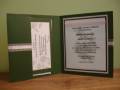
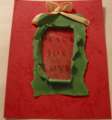
Pictures of the inside of the wedding invitation I made.
I used a small glue gun to glue the edges of the flap shut - SNAIL adhesive was not strong enough. I imagine sticky strip would work too but I didn't have any.
I printed the invitaiton verse on vellum on my computer and then layered it over a piece of white cardstock (same size) with image stamped in CTMH New England Ivy. The pink ribbon was used to cover the line created by using adhesive to stick the vellum to the white cardstock.
*See Card front for more details.
I had a lot of fun (and headache) making these. TFL!
Date: Wednesday, July 18, 2007 GMT Views: 2138
Favorited:46
Registered: September 12, 2004 Location: Fort Carson, CO Posts: 1178
Wed, Jul 18, 2007 @ 2:35 PM
Very pretty! You did an awesome job! Do you have any tips for printing on vellum? I may be doing that for wedding invitations I'll be making and need some pointers as my ink always smears! TFS
When I print on vellum I change my printer settings. If you go into options you should be able to increase the "hold" time (so that it keeps it in the printer a bit longer before spitting it out) and you can also change the setting for how much ink is used (for vellum - decrease it). This is a separate setting from print quality which I left at normal. Sometimes if you just change the paper to "transparency" it does it all for you.
When I don't feel patient enough to really make sure it is dry I use my heat gun to set the ink which seemed to work well to help prevent smearing.
I have also used my printer and increased the quality and amount of ink laid down and decreased the "hold" time. The ink comes out very wet but then you can use clear embossing powder to get a raised look. This is VERY nice, but takes more effort.